10.07.2013

0

(Not) Easy, (Not) Cheap, & (Not) Fun!


A friend of mine was getting rid of her playhouse. A while ago I had pinned a how-to on painting a worn, faded plastic playhouse. I quickly skimmed over the post and figured it would take an afternoon to redo this free one from my friend. Awesome! We went and picked it up. 

Now, to be fair, I wasn't completely misled on what I was about to get into. The OP was quite clear that she only painted the outside. She used 3 colors plus a plastic primer on the door. 

I took that and ended up with 5 colors, doing the inside and outside, AND painting the trim and windows white. The OP recommended Valspar Color Radiance (VCR) because it seemed to work fine without a plastic primer.


I wanted to use this as my color inspiration. The VCR came in colors pretty close to these except I liked the brown and green better from the Valspar The Perfect Finish (VPF) line. They were out of VCR white, so I bought VPF. I grabbed a can of plastic primer just in case.

The colors and how much I used:
VCR Flat Silver Fox (4 cans) - Siding
VPF Satin Everglade Glen (1 can) - Upper Walls
VPF Satin Tropical Foliage (1can) - Shutters
VPF Satin/Flat White (5 cans) Trim, Wainscoting, & Ceiling
VCR Flat Caramel Honey (1 can) - Door

The paint cost about $5 per VCR and $4 for VPF, so roughly $53. Add in drop cloths and a roll of painters tape and you're done.


I bought a three pack of plastic drop cloths and set things up in the driveway. I took the roof and one wall off so I had easy access to the inside.

You can't tell from the above picture, but I started with the brown on the roof first. It went on like a dream. One coat and bam! Done!  Next I tackled the blue/grey on the outside walls. Yikes! It looked like there were pinholes all over the place!


You can also see them in the brown of the roof but the darker color camouflages them a lot better. White makes them show up the worst. I tried both a plastic primer base coat and adding a second coat of color. Neither really seemed to make a difference. These are holes in the plastic via the type and way it's made. It just so happens they are big enough for spray paint to only coat around them. 

Just as an aside, I had a new can of Rust-Oleum Painter's Touch in Summer Squash from another project that go scrapped. Some people SWEAR by the stuff for plastic so I gave it a shot on the door. Words cannot describe how terrible it was. It ran all over the place, bubbled up in corners, and was supper hard to control the coverage. I liked VPF the best of the three. 


This is how I taped off the white trim to paint the walls green. The white had what seems to be zero ability to cover over any color, so I had to do it first then tape over everything.


Unfortunately the white came off in places with the tape. I looked closer and I could easily scrape off any paint color anywhere with a light brush of my fingernail. So much for lasting through much of anything, let alone 3 boys. 

So I got the bright idea to cover over it with clear acrylic. I had a can that's probably 3yrs old (never used) that I dug out of storage, Ultra Clear by Valspar.

I sprayed it on all of the surfaces I thought would get heavy traffic - window sills, door, and door way. 

Imagine going from pretty f'ing terrible to I want to go jump in front of traffic. The paint started bubbling up everywhere.


I touched one bubble and the paint stuck to my finger and peeled off. I let it fully dry and then added a second coat. That seemed to seal it.

So from far away, in the dark, with one eye closed, it doesn't look too bad. What was supposed to be an afternoon or two turned into every free minute over 5 days. 


I also ended up with paint on anything that touched the drop cloths. Yay for overspray.

If I had it to do over, I wouldn't. It took up so much time and the end product was pretty mediocre at best. We are putting it in the basement, so I'm going to cover the bottom in heavy duty tape so there's no chance of the paint rubbing off on the carpet.

8.05.2013

1 comments

Mario Bros Invites

My sister-in-law was researching Mario Bros. invites for her son's upcoming birthday party and came across these by It's the Life:


The author gives a GREAT tutorial to construct these using a Cricut cutting machine, plus some other punches and cutting implements.

I've adapted her designs to the Silhouette.  Not only does it convert a "cut, modify, and assemble" project into a "cut and assemble" one, it lends itself to mass production.  In my case, I needed 6 of each for a total of 24.  Plus, in the Silhouette you can make these any size you'd like.  The original tutorial was for a 5" square invite.  To fit into the 5x5 envelopes my sister-in-law purchased, I needed a slightly smaller 4.75"x4.75".  If you need them bigger or smaller, it's super easy to customize and cut.


These are examples of my assembled invites.  The camera had some exposure issues with poor Toad, but his blue dots were really close in color to the originals, and not as light as they appear.

Ok, so first things first...  In all of my files, I'm using plain cardstock, the kind you buy in the office paper section of Walmart or an office supply store, NOT fancy textured craft paper from the scrapbooking aisle.  If you're using something besides plain cardstock, be sure to check your paper type and corresponding blade settings.

(Download the Master File HERE)


I created a master file of all four characters.  It contains all of the pieces to make one of each type at the original 5"x5" size.  Each invite has all of the pieces grouped together, so you if you need to resize it, all of the pieces will remain proportional.  Ungroup (probably a few times, I over-group things!) them when you are done to access the individual pieces.

If you are making more than one character, it makes sense to group all of the pieces together by color to use your paper efficiently.  Below are the individual files that do this.  IMPORTANT - If you want an invitation size other than 4.75"x4.75", you will need to resize the master file, then populate these individual files with your new piece sizes.

My original goal was to make 6 of each, so whenever possible, you'll see that many parts jammed onto a page.  I also tried to describe how many and what color you'd need per invite.  So for the example immediately below, the paper should be black, and Mario and Luigi get one mustache each.  Toad needs two eyes.  So if you're making 6 like me, you'll need 6 of each kind of mustache and 12 Toad eyes.  (It gets more complicated later, so I'll explain then, too!)

HERE is the zip file for all of the cut files you see below!


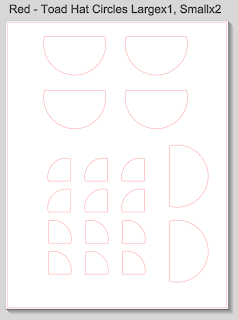
This last one is a bit tricky.  Basically every character shares some of these shapes.  I tried color coding them out to the left to make things clearer.  You'll want to cut Mario's hat and shirt, plus Peach's lips out of red.  Luigi just needs the hat and shirt in green, so you can move Peach's lips off the page before cutting those out.  The very bottom of Peach's dress is the exact same as the hats, so ungroup as needed and move everything else off the page before cutting.  Toad's hat is just Mario's shirt on the top and Mario's hat on the bottom, but in white.  Nix the lips and cut those.

I hope this makes doing these invites easier!  And thanks again to It's the Life for creating the invites and making such a great tutorial so everyone else can, too!

7.20.2013

0

Organizing Photos of Twins

My project this weekend, and possibly for the rest of my natural life, is to get my well over 15,000 pictures of my kids organized.  Step one was getting them all in one place, which happened over the course of a week a few months ago.  Next was importing them into Lightroom 5.  It's been a few hours and that's still going on.  I've decided to start the daunting and near impossible task of tagging the pictures that have loaded so far.  An hour and a half in, I'm on 614.  Um, yeah...

It's not like I didn't start out with a system I thought would work.  I fired up iPhoto on my MacBook back in the day (like 2008), saw the tagging options, and went with it.  Little did I realize that a little laptop was in no way going to be able to contain the sheer amount of photos I was going to take in the next 4 years.  "Bogged down system" doesn't even begin to describe my situation in early 2012.

So now the network drive is holding the colossus, with digital and physical backups scattered across various platforms.  I looked through some of the Lightroom 5 video tutorials and decided to give it a free 30 day try.  Within the software, you are presented with a number of ways to rate, flag, tag, and color code your pictures.  What I am primarily interested in was the tagging.

In the case of identical twins, I may be the only person on the planet that can tell them apart in pictures.  It helps that I took them, certainly, but it's also a matter of staring at their faces every single day.  Sometimes you can cheat and use visual clues (different shoes, certain clothes, etc.), and honestly, sometimes I even have to just guess.  The bottom line is, though, if I get hit by a turnip truck tomorrow, I'd like family to be able to know who is who later on.

Facebook has the best tagging, with a giant square smack dab over their faces.  Anyone can come along and figure that out.  All of the other software I've used keeps the tags as essentially text slapped in some data file somewhere.  This presents a problem for me.  Tagging a picture with both "Alex" and "Zach" tells me they are in there somewhere, but not which is which.  So, the best I could come up with is a 4 tag system that looks like this:

LZach, Alex
LAlex, Zach
(c) Lollipopz Photography
The "L" at the beginning stands for "Left", telling me who is on the left side as I am looking at the picture.  So the tags for the above picture would be "LZach" and "Alex", since Zach is wearing the striped shirt.  My rule of thumb is whoever has a body part closest to the left side of the picture wins the "L".  It can get tricky when they are wrestling on the bed, but I'm ok with a small margin of error.  Plus I never just take one photo of anything.  Check the 10 before and after it and I'm sure you can figure it out.
 
I choose to put the "L" first so if I'm typing in the tags, two keystrokes will get me the auto fill for what I want.  If you put it at the end, you're going to have to do more work.
 
This also gives me the potential benefit of being able to find pictures of just one or the other, assuming Lightroom will let me exclude tags.  So if I want ones of just Zach by himself, I'd search for pictures with "Zach" but without "LAlex".  We will see if this is possible.

7.15.2013

0

Top 10 (+1) Things for RV'ing with Kids


We just got back from a 10 day, 1.2k mile RV trip with two 4yr olds and a 1yr old. We drove that 25ft beast through the mountains, tried out a couple of campgrounds, and used it as our primary residence while visiting my parents.  During the trip it became obvious what was important, and what we should have left at home.

Top 11 Things That Were Useful
(Referencing the picture at the top)

1. Headphones for the Kids - On the way up to Ohio, it was amazing how loud the RV was. When I saw them putting the iWhatevers on max volume and holding the speakers to their ears, I knew we had a problem. I ordered these (http://amzn.com/B009396UGM) from Amazon for the trip back and they were awesome! I looked for ones with noise reducers to decrease the chance of hearing damage.

2. Disposable Gloves - If you plan on using anything that would drain into the holding tanks, these are a good idea. You might not have an easy way to wash your hands and dealing with the sewer drain hose is the first and last thing you'll be doing at a campsite. 

3. Quiet Candy - Safe-T-Pops were a big hit and even the 1yr old could handle one himself. When the mongrel horde started chanting "Out! Out!" these appeased them for quite a while. They also helped pop ears in the mountains. Candy necklaces and bubble gum crayons worked, too, for the older ones. Anything that takes a long time to eat fits the bill. 

4. Travel Crib - I don't think a full size pack 'n play would fit on the floor space of a 25ft RV. Plus this thing was way easier to put up and take down everyday. 


We used it on the floor so the table area was available to hold car seats (if we were driving that day) or to quickly transition into breakfast. 

5. Bottled Water - I'm not really taking about the individual ones, but the gallon sizes. While the rental RV comes with a potable water holding tank and a hose hookup, there's no real way to be sure they are sanitary. The giant "DO NOT DRINK THE WATER" sign by the sink was also persuasive. We brought 3 gal with us and used those to fill the coffee maker and our water bottles. The gallon bottles were refilled with clean tap water at my parent's house a few times, too.

6. Hand Vacuum - Honestly, in order of importance, this should be number one. I had no idea how dirty the floor of the RV would get just cruising down the road while the kids ate snacks. I was totally grossed out by day two and borrowed my Dad's hand held vacuum about 30sec after we pulled into their driveway. A stick version would work ok, as would a broom, but a hand held one can also easily clean out crumb filled car seats. 

7. Garbage Bags with Tie Loops - We used the kitchen size and stuck part of the loop over the vertically positioned arm rest of the front seat. This kept the bag both upright and within easy reach to throw things away while buckled in. 

8. Bed Rails - We decided to put Alex and Zach in the bed above the driver's cab. It was the largest bed and if Mason woke up in the middle of the night, I didn't want to descend Mt. Everest to get to him. It's like a solid 5ft drop to the floor, so we used a bed rail tucked under the mattress.  It gave the boys just enough room to shimmy up the side to get in/out by themselves. 

9. Waterproof Shoes - Even if you aren't going to the beach, these will come in handy. The weather is right outside the door of the RV, and you don't want to wear soggy tennis shoes for a week. 

10. King Size Sheet - I asked multiple people multiple times for the bed sizes. (You could rent a linen package for $100. Uh, no thanks.) Everyone told me "They're all queen." The bed over the cab is definitely not a queen. A king size or even a CA king might be your best bet.

11. Coffee Maker - Obviously, if you don't drink coffee, please don't bring one. There isn't a magic use for it or anything! It was just another cost savings for us. If the generator was already running to power the air while we drove, we had power for the k-cup machine*. So rather than trying to find a place to get Jim a decent cup, we made our own.

*The picture shows a regular coffee maker. I wouldn't recommend brewing a pot while in transit!
0

Nom Nom Nom

Something, probably squirrels of the tree or ground variety, have been enjoying the garden immensely. They were kind enough to leave a couple of leaves on the green beans, but stripped the lettuces clean.


The corn gave up trying to get taller and sprouted the beginnings of an ear. A couple of zucchini started to grow but bugs were more than happy to chomp them into mush. There are a lot more flowers, so we'll see who wins the race. 


The most surprising we're the tomatoes. One plant has taken off and I had to coax it through a cage for support. Naturally I accidentally snapped off a flowering branch, one of only two so far. I apologized but I'm pretty sure it's still offended.

I pulled all of the dead peas down. Being the beginning of July, maybe there's something else I can plant there. 


The carrots and basil seem to be the happiest right now, although the pumpkin and kale aren't too bad. The kale would be great if bugs would stop eating it. Something with teeth has been tasting the mint, too. 

What hasn't done well at all was the cilantro (my fault), cauliflower, spinach, and broccoli. Perhaps I'm doing something inadvertently to anger the cabbage family?  Who knows. 

The veggies have been fun but I might do  two boxes of flowers instead of one next time. And buy fully grown tomatoes in their own pots. 

7.02.2013

0

Hitting the Road


In a couple of days we will be loading up all of our junk into a rented RV and heading to my parent's house about 550 miles away.  I'd always said I wanted to rent one and head west, where it was more about the journey than the destination.  So when we started weighing our options when visiting my family, it fit the bill the best.  They don't really have room for us at their house, we are super early at getting up and going to bed, and the nearest hotel is 45min away.  To top it off, they already had an RV pad and hookups from hosting my grandfather's a number of times.

You'd think I'd be leaping around, tossing flowers, and singing with happiness at the thought of scratching an item off my bucket list.  I. am. not. I'm scared and have been combatting my anxiety with overplanning activities for the trip.  Pinterest became my enabler and I didn't look back.  If you're looking for things that will be completely overkill for a 9-10hr trip, you've come to the right place.


I made both 4yr old boys a bag of goodies to keep with them during the trip:
  1. Pizza baking sheet and three containers from Dollar Tree.  I glued magnets to the bottom of the containers so they wouldn't slide.  The store was out of the regular cookie sheets, so this was the best I could do.  Turns out they fit perfectly on their laps between the arms of their car seat.  I experimented with hot gluing foam on the bottoms, but I was too lazy and didn't like the look.
  2. Reusable grocery bag I had left over from the Doc McStuffins party.
  3. Random toys from the dollar store.  I wrapped some, including funny socks, a pocket fan, toy helicopter, and a ball on a lanyard.
  4. My homemade "I Spy" jar of rice and little items.  The container and rice are from the dollar store.  You can see my laminated answer key thing below.  The reusable fruit ice cubes and the plastic heart are dollar store buys.  The rest are foam stickers from Walmart.
  5. Ignore this.  I covered it in #3 and am too tired to go back and change the picture.
  6. A Super Fantastic Binder that belongs to Alex, obviously!


I managed to jam a ton of stuff into a 1.5in binder, as you can see above.
  1. One of those baggies with hair gel and food coloring in it, that you draw on with a q-tip.  I put it in a 3 ring binder zipper pouch for safe keeping.
  2. A bunch of sheets ripped out from the Kumon books at Costco.  I went with mazes and cutting.
  3. A clear 3 ring binder pencil case full of foam and regular stickers, purchased at Walmart and Dollar Tree.
  4. A clear 3 ring binder pencil case full of pipe cleaners, kid scissors, feather pen, washable crayons, and ring stamps.  Everything was from the dollar store.
  5. Construction paper, pages ripped out of a truck coloring book, and a letter recognition sheet that you stamp with bingo markers.
  6. A composition notebook, 3 ring pouch to put it in, and a blank white paper pad.


You don't honestly think I stopped there, do you?  I wasn't kidding when I said overboard.  Here are the supplemental materials I'll have with me, to hand out as needed.
  1. I wasted a whole number to point out a reusable grocery bag, which is identical to the last one I showed you.
  2. Laminated memory game cards (4).  You cover the pictures with tokens and try to find the matching ones.  I literally googled "cute clipart" and picked what I liked for a total of 10 images.
  3. A gallon bag with giant foam dice (bookmarked kids dice games), paper fish with paper clips (to make a fishing game on the fly with the ball on the lanyard and a sticky backed magnet), and two small rainbow colored paper pads.
  4. A giant box of crayons and colored pencils, sticky-backed foam sheets, and a zipper pouch of cheap bracelets and necklaces.
  5. Large laminated cutouts of Zach and Alex (to draw on with dry erase markers), "I Spy" answer keys, and a zippered pouch with The Artist Who Painted a Blue Horse game.
  6. The rest of the Kumon books, a Disney Jr coloring book, baggy of dry erase, window, bingo, and foam markers, dollar store clay, painter's tape, a stamp kit, two decks of cards, wedding bubbles, and a pouch with a foam puzzle.
Not pictured because I still need to make them are the wooden tokens for the memory cards.  I want to put magnets on the back so they stick to the pizza trays, but ran out of materials.  I also didn't show you all of the board books and toys I have for the baby.  I got him a couple of nice new ones, since he'll eat dollar store stuff.  There are also a ton of crackers, cookies, mini candy bars, and lollipops.

Two good places to find kids songs for the road are bussongs.com and kididdles.com.  Yeah, just putting that out there.


 On top of all of that, I'm going to have the boys color in some RV clipart I made.  I'll run a clothesline in the RV with the hours marked off on it.  Their RV's will ride from our house to grandma and pap's house via the line, to give a visual of how far we've gone and how much we need to go.  You can find more info about it here.

Before you think I'm all about the enriching activities, an iPhone, iPad, iPad mini, travel DVD players, AND the WiiU will be making the trip with us.  If things get bad, I'm willing to go full on video zombie if that's what it takes. 
 
Fear is a strong motivator.

7.01.2013

0

Not On Purpose Plants

At best I'd say I have a brown thumb. If you are a picky plant, we probably can't be friends. If you would survive in an abandoned lot, then maybe we will get along.


Case in point is this weed I didn't get around to pulling. It was little a few days ago, just like the rest, but has since taken off. Now that it's big, I'm pretty sure it's a watermelon. Crazy, huh?

We had a bunch of them growing in the wooded area of our backyard last year when we moved in. I didn't notice them for two weeks and they ended up producing 4 melons for eating and a bunch that rotted in place.

This year we had all of that area graded and sodded, so I figured the watermelon were done for. Apparently I was wrong, although I'm not sure right next to the house is the best place for the little guy. 

6.21.2013

0

Alex and Zach's 4th Birthday


The Doc McZach is in! The boys' favorite show is Doc McStuffins, so it was a natural choice for their 4th birthday theme.  I'll be honest - I was pretty excited myself, but for different reasons.  After doing a farm theme (aka the last time I EVER make cakes from scratch), a lame version of Max and Ruby, and two parties with diggers and dump trucks, I was ready to ride the Disney merchandizing train all the way into the party station.
 
I waltzed into the nearest Wal-Mart, wallet in hand, ready to buy a party.  I saw Mickey, Jake and the Neverland Pirates, and a ton of princess stuff.  Guess what?  No Doc.  Target and a random sampling of craft stores didn't turn up anything, either.  Are you kidding me???  Amazon tried with some latex balloons, but ugh...
 
To top things off, my kids had discovered Pinterest.  Not a big deal, you say?  They spent HOURS looking through kids' birthday cakes - the ultra fancy ones, mind you.  Plus every person they met, from the guy bagging our groceries, to the random person innocently pushing their kid on a swing at the park, heard all about how they were turning 4 on June 4th and they were having a Doc McStuffins party.  Expectations?  They had them.
 
So with the cake booked two months in advance, because I dumbly decided to have kids during the peak of wedding season, I began preparations for a Doc McStuffins party.  I hit up Pinterest and you can check out my board here if you like.  I decided that blue, pink, and purple were the colors.  Lambie is their favorite character.  I have a Silhouette Cameo, ink jet printer, glue gun, and random smattering of craft supplies at my disposal.  Click on the pictures for a MUCH bigger version if things are tough to make out.
 
I'm going to start with the party décor and see how far I get.  In the picture at the top, you can see our "The Doc is In" sign.  You can download it here from Disney.  The link also includes instructions to make it, which I apparently didn't follow at all.
 
Instead I combined 8 large craft sticks, some hot glue, and the signs (In//Out) printed out on card stock.  I drilled holes in two sticks and threaded some Dollar Tree clothesline through.  A couple of knots and a 3M hook later and we had a sign on the front door.  What I didn't think about at the time was how much fun the boys would have with the sign.  It hangs on their bedroom door now, and I must hear "The Doc is Out!" one hundred times a day.  Well worth the 30min and scrap supplies I put into it.


The white shirt was $4 at WalMart and I had the ink jet heat transfer material left over from another project.  I imported the Lambie art from WondersofDisney.com and built the rest in the Silhouette software.  You can download my Silhouette file here, and the font you'll probably need to go with it here.  If your kids aren't named Alex and Zach and they aren't turning four, you'll probably need to ungroup the items and tweak the text (purple/pink and the white offset).  You can mirror image it so you don't go insane trying to get things to look right, but don't forget to flip it back around before printing!
 
 
Party City had the overpriced tissue paper pompoms, curly streamers and purple streamers, but I needed to pick my battles.  The Dollar Tree and Walmart took my money and handed me the table cloths and blue/pink streamer material.  You'll need to check the baby sections for the pink and blue, though.  I ordered two packs of Doc McStuffins removable wall decals from Amazon.  They were on the small side for our giant, bare walls, but we made due.  (Once the party was over, some of them moved to the boys' bathroom to decorate in there.)  The table was for guests to write their name on their badges and pick up their doctor kits. I'll cover those more once I get there.
 
 
The balloons are from the Dollar Tree and are still inflated and floating around 3 weeks later.  They were out of the pink stars so I called an audible and bought pink "Happy Birthday" ones instead.
 
 
I saw a pin for some awesome centerpieces but couldn't figure out how to order them from the website.  Instead I grabbed Doc art from WondersofDisney.com again and made my own.  The only downside is I couldn't find art of anyone except the 5 main characters.  That company got it somewhere, but I couldn't figure it out.
 
 
What you'll need:
  • ~30 sheets of cardstock
  • 5 Large craft sticks
  • 3 Floral foam blocks in the 5in range
  • Hacksaw, knife, or something that cuts foam blocks
  • Hot glue and gun
  • Silhouette and printer
  • My Silhouette file here ( and font here if you need it)
  • Tissue paper, purple in my case
1. I cut the foam blocks in half with a hacksaw.  It was crazy messy, so I went all horror movie on them outside.
 
2. Slap a Doc character into your Silhouette program and add a significant offset.  Print and cut it.
 
3. Do a mirror image of the whole thing, delete the original, and print/cut it.
 
4. Repeat steps 2 and 3 for each character.
 
5. Open my CenterSquare.studio file and modify the text and offset as needed. Print and cut.
 
6. Hot glue the squares directly to the foam.  Let the edges stick out as needed.  Kids do not care if things line up.  Honest!
 
7. Hot glue both sides of each character to a craft stick and jam the whole thing into the craft foam.
 
8. Fluff up little pieces of the tissue paper and put them inside of the faux boxes you made.


Our basement is terrible for pictures, but I think you can get the idea of our clinic.  I took our existing IKEA kid's table and covered it with a chunk of egg carton foam ($10 at Walmart).  Over top of everything I put some fleece in a lovely lime green I had laying around.  If I wasn't cheap, or could not face yet another trip to the store, it would have been better being blue or purple.  This made our exam table.  Scattered across the surface are the pieces of Melissa & Doug doctor's kits, and items from the medical bags we handed out.
 
In the background is my poor recreation of the growth chart Doc has in her clinic, plus our family scale.  You can find the Silhouette flower here, although I'll be the first to admit that it was too small.  The stem and leaf are green construction paper.


I figured the kids would spend 10 seconds giving their toy a checkup then move on to something more fun, but that wasn't the case.  One of my friends (seen patching up a doll) helped the kids and they spent quite a bit of time working on their diagnoses.  You can see one of my kids in the white shirt attempting to weigh his toy on the scale.
 
Next time I'll go over what's in that mysterious purple doctor's bag, our invites, plus how we did the food (without grossing out anyone!).

6.18.2013

0

Squished Squash

Jim needs a bumper sticker on his lawn mower that reads "I don't brake for vines."  One bed of squash (pumpkin, zucchini, and summer yellow) has taken off and is making double-time across the mulch toward the grass.

To save it from a rather abrupt end to its journey, I tossed together a tri-pod trellis.


You can find a list of materials here:
http://organicgardening.com/learn-and-grow/simple-squash-trellis

I pretty much flipped through the instructions to get the basic idea and winged it. I didn't pull out a tape measure, but I assure you it's straight. The ground? Not so much.


You'll need a 1/4" drill bit to make holes for the bolt. I only used 4 of the 2"x2"x8' since I attached the legs directly to my beds with 3" wood screws. I didn't have any twine, either, so I used another couple of 3" screws to hold things together at the top. I had the cheapest wood possible, so the whole thing cost around $20.

Concerned my squash might be too inexperienced to figure out a trellis with such wide spacing, I stretched a nylon garden net over one side and secured it with 1 1/2" wood screws.


I carefully (because I forgot to wear gloves) encouraged the squash to attempt the climb. We will see if I end up with a leafy tunnel or it gives up and heads for the grass again.  


I checked on the green beans. There are a few started but something is eating them before they get big. It's hard to appreciate in the picture, but the purple beans have this awesome green fuzz that makes them appear almost iridescent. 


The carrots are still too little to pick but are quite fluffy on top. The kids love running their hands through them. 

6.07.2013

0

The Garden


After about five days of rain, I finally checked on the garden. I had been worried that the peas would have been scorched by the sun before making a single sphere, but temps have stayed low with storms constantly blowing over.

So Alex helped me with a second harvest of snow peas. Some made it into the bucket and many got "lost" on the way. I got a couple of "I wuff peas, mom!" As he talked over a full mouth. 


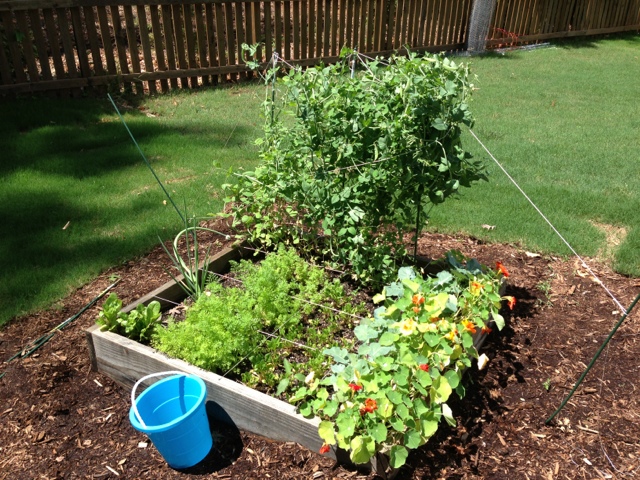
The spring garden box is doing pretty well. You can just see the tiny orange carrots starting out, and the accidental onion has taken his chance at growing to heart. I'm not sure if the broccoli will make it before it gets too hot, but that's ok.


I've never grown an onion, and didn't plan to, so we are just learning as we go. 

One thing that's obvious is proper drainage in this monsoon is key. With drought conditions the past +6 years, I wasn't prepared. 


The bed on the front left has a bottom layer of grass clippings as a weed deterrent. The one on the front right has cardboard, because I thought I'd need to hold into as much water as possible. Both boxes have the same squash, zucchini, and kale but with a drastic difference in results!


I picked a decent amount of kale already but discovered caterpillars working their way through the leaves. It appears the are gone, and there should be enough left for the plants to recover. 


Here are a few other pictures from around our small patch of veggies. 


Bush bean flowers. 


Corn learning to swim. 


Spicy tasting broccoli protectors. 


Bony looking peas. 


Our spring garden with the peas tied into submission. Poor broccoli were in an eternal shadow. 


Blackberries making a start in the corner of the yard. 


One transplanted Azalea bush has stopped holding a grudge and is trying to bloom a second time.